So you got the Mavic Mini or Mavic Air 2 or the Skydio 2, what next? I will take you through the step by step guide to flying your newly acquired drone. The choice of manufacturer is not as important as the weight of the drone. The weight of the drone will determine your next step.
1. Know The rules
250grams weight Drone
Drones that weigh less than 250 grams are called Microdrone like the Mavic mini. You do not need to register Microdrone in Canada but you must;
- Fly safely by not putting people or other aircraft in danger
- Avoid emergency sites and restricted airspace
- Follow provincial, territorial or municipal rules that may apply in your location or where you intend to fly.
- Check with your locality about their privacy and trespassing laws.

In addition, you should;
- Keep your drone below 122 meters/400 feet in the air
- Avoid advertised events and airports
- Maintain visual line of sight (VLOS) at all times
- Don’t fly over people
What did FAA say?
According to the Federal Aviation Administration (FAA) in the United States, you have 2 options;
- Fly under the rules for Recreational Flyers and Community- Based Organization
- Operate under Part 107 rules. The summary of the rules can be found here
The only exception to registering a drone under 250 grams like the Mavic Mini is if the drone is for recreational purpose. Read the rules for the FAA here. In the United states, you should
- Register your drone and mark it on the outside of your drone. Carry the registration on you as proof. Registration cost $5. You can register here
- Fly for recreational purpose only
- Fly your drone below 400 feet
- Obtain authorization to fly in controlled airspace
- Keep your drone within visual line of sight
- Do not fly at night unless your drone have lighting. Lighting will allow you to know its location and orientation at all times
- Never fly over any person or moving vehicle
- Never interfere with emergency response activities
- Be fit at all times
- Do not operate your drone in a careless or reckless manner
Be sure to understand the implication of adding accessories to your drones. This will change the take-off weight of the drone. The take-off weight of the drone determine if the rules apply or not.
250g up to 25kg
If your new drone weigh 250g up to 25kg like the Mavic Air 2 , the first thing you will have to do is;
- Register your drone. If you live in Canada, you can register here. Mark the registration number on the drone. The FAA in the United States have the same rule. The registration number must be visible on an outside surface of the drone. You can use engraving, permanent label or permanent marker.
- Obtain a drone pilot certificate. There are two types of drone pilot certificate obtainable in Canada- Basic operations and Advance operations certificate. Under the FAA’s Part 107 rule, drone pilot will obtain a Remote Pilot Certificate and demonstrate an understanding of the regulations, operating requirements and procedures for safely flying drones. You can find the requirements here
2. Where can I fly?
Apart from the drone manufacturer’s application, there are other apps you can download. These apps make flying a drone legally, easy. These recommended applications will identify classes of airspace and flying restrictions that may exist in those airspace. You cannot fly in all airspace. The FAA recommend the B4UFLY application. You can download it from the IOS store or the google play store. This application will help recreational drone flyers know weather it is safe to fly their drone in the airspace or location they choose.
Transport Canada is responsible for transportation policies and program. It recommends the Drone Site Selection tool for drone pilots in Canada. The map is easy to use and opens in any browser. There are other applications like Air-Map for Drones– good for site survey, and Drone Pilot Canada. UAV forecast for DJI quadcopter application is good for weather forecast.
3. Know your drone
Now that we have the law out of the way, it is time to check your aircraft. Drones can be controlled with software downloaded to your phone. For example, the DJI GO and DJI Fly apps gives users total control of many aspects of the drone. Some controls include gimbal camera movement, access to media, camera modes, aircraft altitude and speed. Controllers for drones have a standard layout consisting of control stick and buttons. Despite the different shapes and sizes, they have the same basic functions. For the sake of simplicity, I will talk about the modes commonly found on the consumer drones like the DJI Mavic series.
The left stick is used to ascend, descend or roll the aircraft. The right stick is used to move the aircraft forward, backward, left or right. The orientation of the aircraft with respect to the movement left or right is determined by the direction the aircraft is facing. For safety reasons, make sure the aircraft is facing away from you i.e the camera is pointed away from you.
Buttons on the controller are used to control the camera. These buttons can take a photo, record video, tilt or pan the camera and also access menu for more controls within the drone application.

To know your drone, you should;
- Read the manual
- Check the drone batteries and the controller batteries
- Confirm the propellers are installed correctly
- Download the required application to control the drone. Some drones require the application to be downloaded to your phone. Some drones have their stand alone controller. The DJI Mavic Air 2 have a dedicated controller but requires an application download to a phone for visual reference and drone control.
- Ensure the required updates are downloaded. Usually, the drone application will prompt for updates if they are available
- Find an open, safe place with a level ground. You can have landing pad placed between the ground and the drone. This will prevent dust and debris from getting into the gimbal.
- Set the Return to home altitude. You need to constantly check this before every flight. It is determined by setting it above the highest obstacle in your environment.
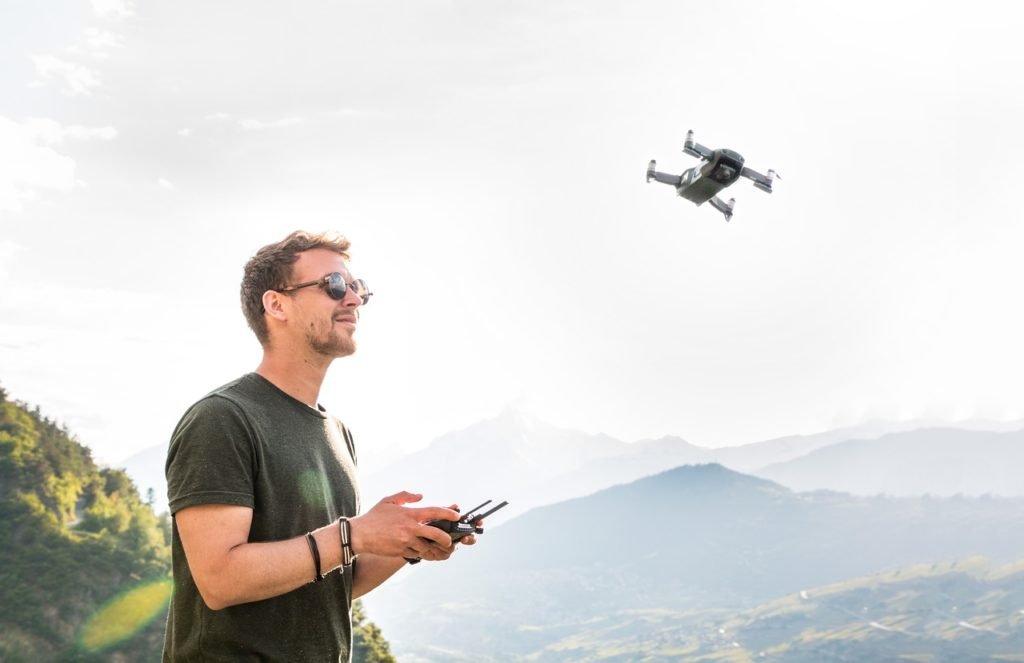
4. Take your first flight
Now that you have mastered your drone controls, go out to an open space and prepare to fly your drone. Take a minute to know your surroundings and observe every obstacle like buildings, trees or other structures in your location. The last thing you want is crashing your brand new drone on your first flight. I know you are excited and it is relatively straightforward to take off. But know how each movement of a button on your controller affects the drone. Practice some basic maneuvers like forward, backward, left and right movements. There are some online video material here that can guide you. DJI Go apps have a flight simulator to help you familiarize yourself with the controller inputs. Look for the following before taking off
- Check the weather conditions. The UAV forecast app will help
- Check obstacles like buildings , telephone line, power lines, thin ropes. Be aware of your environment
- Observe to see if animals and people are around. Do not practice around people
- Confirm the GPS signal strength
- Insert your memory card
- Check the camera settings
- Use beginner mode to practice.
- Hover your aircraft before heading out.
- Slowly push the controls and avoid sharp or jittery movements.
- Pay attention to the battery status indicator
The more you practice, the more you fly better.
This page contains affiliate links. If you click an affiliate link, I will receive a form of compensation at no cost to you. This will help to support the site.